
How Are Indoor 3D Letters Mounted? Glue, Screws, or Standoff?
Posted by Mengban Team on Oct 14th 2026
When planning your reception logo wall, many business owners fixate only on letter material and design. But the mounting method is just as important.
The way you attach 3D letters determines whether your wall gets damaged, how easy removal will be later, and the final visual effect.
There are three common installation methods for indoor 3D letters: adhesive mounting, direct screw mounting, and standoff mounting. Let’s break down each option, their pros, cons and suitable wall surfaces.
1. Adhesive / Glue Mounting
Adhesive mounting means sticking letters directly onto the wall with heavy-duty construction adhesive, no drilled holes.
✅ Pros
- No drilling, quick installation.
- No visible hardware, clean seamless look.
- Low labor cost.
❌ Cons
- Hard to remove. Taking letters off often peels paint or drywall.
- Not suitable for uneven, dusty or porous walls.
- Weight limit: only for lightweight acrylic letters. Not recommended for large stainless steel letters.
Best for: Smooth painted drywall, small lightweight acrylic logos, offices that do not plan to relocate or update the sign soon.
2. Direct Screw Mounting
Letters are fastened flat against the wall using screws drilled through the letter body.
✅ Pros
- Strong and secure. Works for heavier stainless steel signs.
- Reliable long-term hold.
- Works on solid surfaces: concrete, wood panel, brick.
❌ Cons
- Requires drilling holes in your wall.
- Holes remain visible after removing letters and need patching.
- Small screw heads may show on letter surface depending on finish.
Best for: Solid, durable wall substrates, permanent logos, larger or heavier metal 3D letters.
3. Standoff Mounting (Spacers / Floating Letters)
Standoffs are small metal spacers that lift letters slightly off the wall, creating an elegant floating shadow effect.
✅ Pros
- Premium, high-end look favored by law firms, clinics and accounting offices.
- Simple to remove: only the small standoff holes remain.
- Works for both acrylic and stainless steel letters.
❌ Cons
- Requires drilling for each standoff point.
- Higher material and installation cost than glue mounting.
Best for: Professional service offices wanting a sophisticated upscale aesthetic; walls you are willing to drill minor holes.
Quick Comparison Table
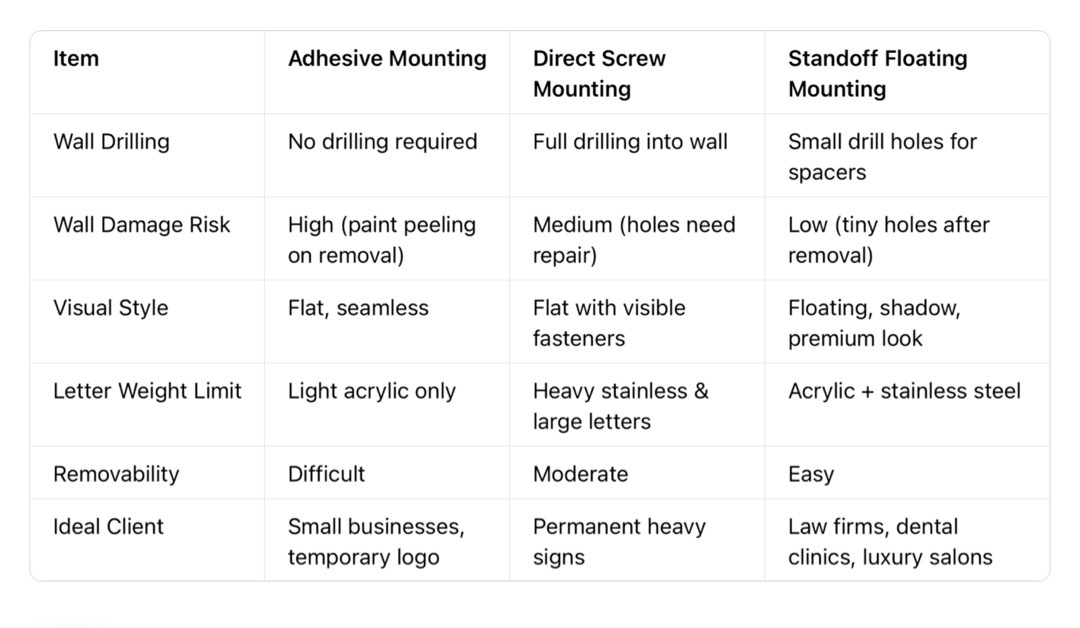
If you are still deciding between metal and plastic logo styles, read our guide: Stainless Steel vs Acrylic Letters for Law Offices: Which Looks More Professional?
How to Pick The Right Mounting Method
- If you rent the office and want to avoid major wall damage: Standoff is usually the safest choice. Glue is risky, it often damages rental walls.
- If you own the building and installing a permanent heavy stainless logo: Direct screw mounting offers maximum stability.
- If you have a small acrylic logo, smooth wall and will not change the sign for many years: Adhesive works well.
Key Pre-Install Checklist
✅ Check your wall type (drywall, concrete, wood panel, marble) before ordering letters
✅ Confirm if you are renting or own the office space
✅ Think ahead: Will you move or rebrand within 3–5 years?
✅ Match mounting style to your brand vibe (standoff adds a premium feel for professional offices)
The mounting style completes your reception sign. It’s not just about fixing letters on the wall; it shapes the whole impression your clients get the moment they walk in.
Share your wall type and office situation with our team. We help you select the best mounting solution for custom indoor 3D letter signs. Submit your project details via the form on our website.
If you need custom indoor 3D letter signage tailored for law offices and professional service spaces, submit your project details through our online form. Our team will provide material recommendations and custom solutions based on your office style and budget.
Turn brand vision into benchmark-grade signage.
See more real project examples on Instagram and LinkedIn — search @MengbanSign.